I am often asked if I give glass classes, and my usual response is that fusing glass is a slow process, and perhaps not ideal for a short class. However, here’s a little fun anybody can try at home. Why not turn a favourite bottle into a unique drinking glass! I did this myself during the lockdown, just for fun. You don’t need to invest a lot of money, but you will need to be patient, and don’t expect perfection on your first try. Maybe try it out once or twice before using your very favourite bottle!
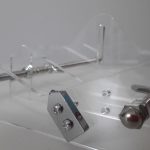
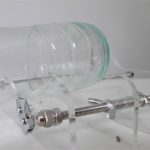
You’ll need a way to score your bottle. The easiest way to do this, I suggest would be to buy one of these bottle cutting kits. They cost less than €10 online. I’ve shown you a close-up of the scoring blade, and another picture showing how to set the bottle onto the gadget. Then – this is the important bit – holding the bottle very steady, pull the bottle towards you until you have a single score line right round the perimeter of the bottle. Don’t score more than once. You should hear the score being made.
That’s stage 1 done – that’s the fundamentally important part – but maybe the quickest part too!!
Then you have to somehow get the bottle to break along your nice score line. If you Google it, you’ll find lots of theories on how best to do this, and I’ve tried most of them, I think. Basically you have to create some temperature tension, and here’s the way I have found it most successful.
Fill a pot with very cold water, and have it sitting beside you – say, at the kitchen table. Some kitchen paper will also be helpful. Then light a tealight and make yourself comfortable in front of it. Holding the bottle in both hands, turn it over and over, with the score line just above the hottest part of the flame. Keep rotating the bottle along that line. Be patient, it takes a long time for the score line to heat up all around the bottle. You have got to keep rotating the bottle – if you have one side hot and the other side cold, you will eventually end up with a crack.
Every once in a while, place the bottle into the pot of cold water, submerging the score line. Move it around in the water. Then take it out and start the whole process again.
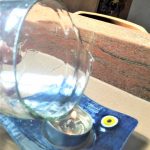 This process could take half an hour. Eventually, you’ll hear it crack when you place it into the cold water, and with a little luck, you’ll have a nice even break along your score line.
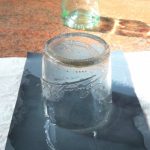
I did two bottles in the same experiment, and one broke nice and evenly. The other was a bit jaggy, which you can see in this photograph.
That’s stage 2 complete, and you have what resembles a glass! But it will be too sharp to drink from. The final stage is just to sand the sharp edges off. For this you’ll need special silicon carbide sand paper, which you can use wet. (All grinding/sanding/drilling of glass has to be done using water).
 Wet the paper, and using a circular motion, just keep moving the glass on the sand paper. Again this will require patience, and a bit of determination! You can get silicon carbide sandpaper in different grades, and it is helpful, naturally, to start with a rough paper, progressing to a fine grade paper, when most of the rough edges are gone. Don’t forget to carefully sand the inside and outside edges too.
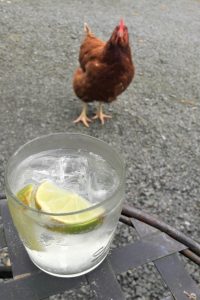
I think it’s work the effort though, because when you’re done, you’ll have made some glasses that you can be really proud of. You could make a set to give as a gift to someone special.
They’ll always prompt a conversation, and are ideal for using when having drinks in the garden with friends!
If you’ve enjoyed this, and would like to try out some glass experiments, I’d wholeheartedly recommend you look at the work of accomplished Irish glass maker and designer http://www.lauraquinndesign.com. During lockdown, Laura made a series of YouTube videos called Home Glass Hacks – check them out, and give glass a go!
